Foundation polishing
(Shitaji-Togi)
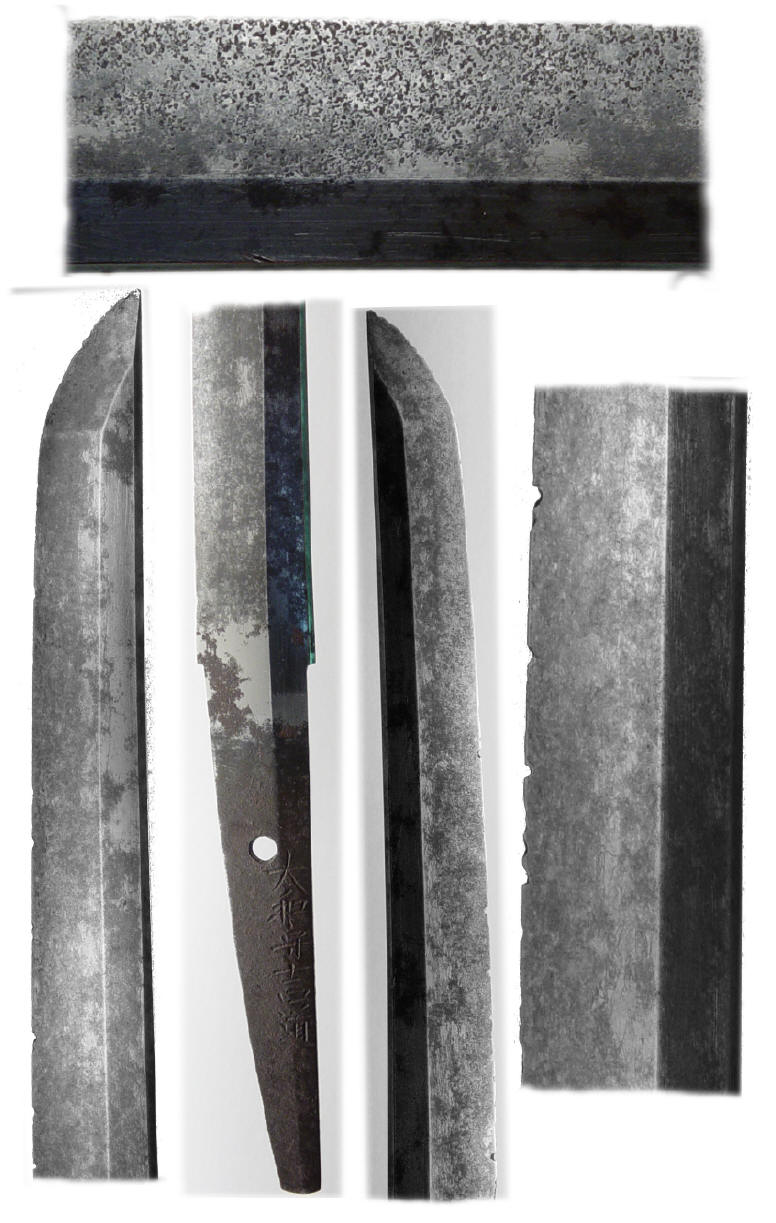
Lets start with this sword. It is signed Yamato no kami Yoshimich, a well known smith. It is in a deplorable condition and would be a very desirable sword in a full polish.
The first step is to evaluate if it can be polished and brought back to a beautiful condition, and I feel that it can be. On a sword that has a large amount of rust and damages like chip (hakobori) it is a little bit of a gamble, but I feel confident that it will be fine and prepare to polish the sword. Selecting the correct stones is critical to achieve the the best results. I have to remove the rust and the chips on this sword and at the same time keep the correct shape and geometry. All the lines on the sword must be sharp and the Niku on the blade must not be removed.
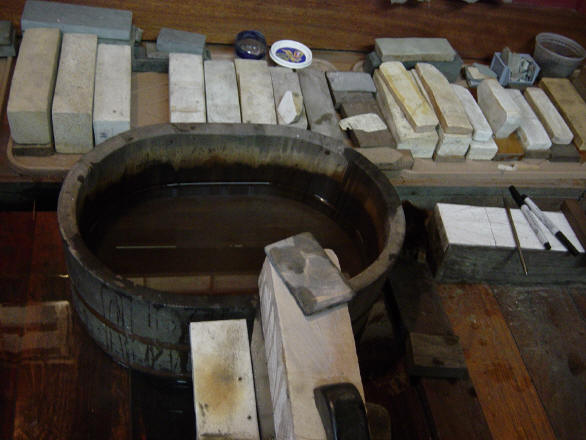
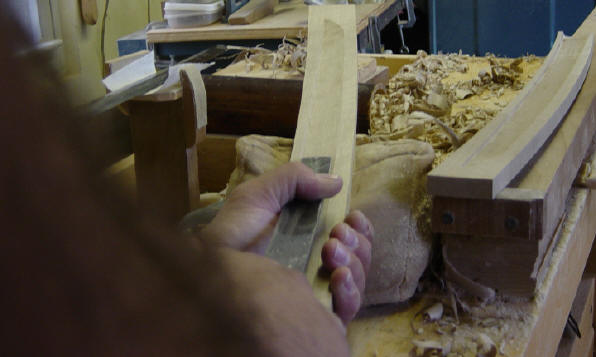
After selecting the stones needed, I get to work. The stone has to be dressed to achieve a good shape. The shape of the stone is very important to help you maintain a good shape on the sword.

The Mune and Shinogi are the first to be polished followed by the Ji.
Next is the point (Kisaki). This area of the sword is very delicate and the mitsukado must be correctly polished. If too much of the metal is lost in the Mitsukado area, then sword will be ruined. The placement of the Yokote is also important for a beautiful polish.
![]()

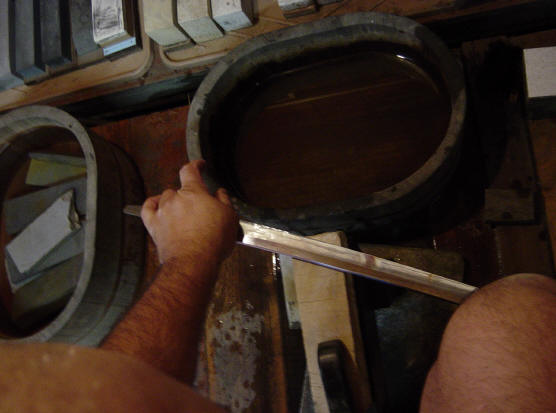
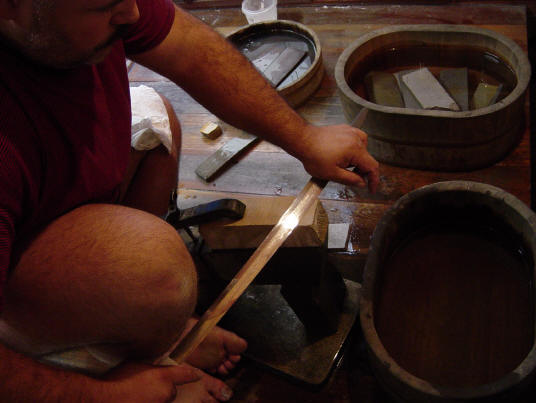
Through all of this, I want to remove as little metal as possible. Generally I try to start with the BINSUI stone, but on this particular sword, I will have to start with an ARATO stone. With this stone I will remove the majority of the rust and chips on the blade and also establish the foundation of the sword. After that, I go to a BINSUI stone to remove the scratches left by the ARATO stone and change the angle of the sword on the stone so as to see the difference between the ARATO and BINSUI marks. The BINSUI stone still can remove a lot of steel, so I have to be very careful to keep the shape of the sword and remove as little as possible so that I can move onto the next step.
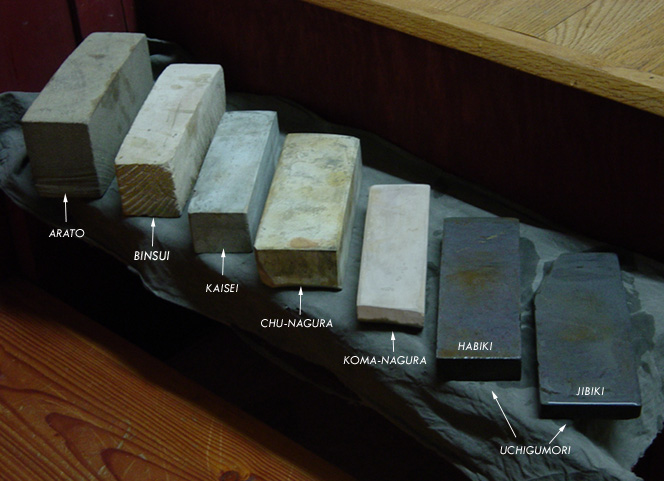
Next is the KAISAEI stone, again changing the angle and removing the scratches left by the BINSUI stone. After KAISAEI comes the CHU-NAGURA stone and then the KOMA-NAGURA stone. At the KOMA-NAGURA stage, the sword is starting to show the Hamon. This sword has a very nice Hamon that is typical of this smith. At this time a Habaki can be made for the newly polished sword afterwards a new Shirasaya is made for it. On this particular sword, the owner want to keep the original habaki and just have a Shirasaya made for it.

![]()
After the Shirasaya is complete, I then start working with the UCHIGUMORI stones. This is a very critical stage because UCHIGUMORI come in many different grades and hardness. No one stone will work for every sword, so having many different stones is very helpful. Good quality UCHGUMORI are expensive just like swords. UCHIGUMORI can basically be categorized in two types. HABIKI and JIBIKI, one that is used for the Ha and the other for the Ji. At this stage a lot of work is also required to get a very good, even and clear Ji. It is impossible to finish a sword properly if this process isn't done correctly.
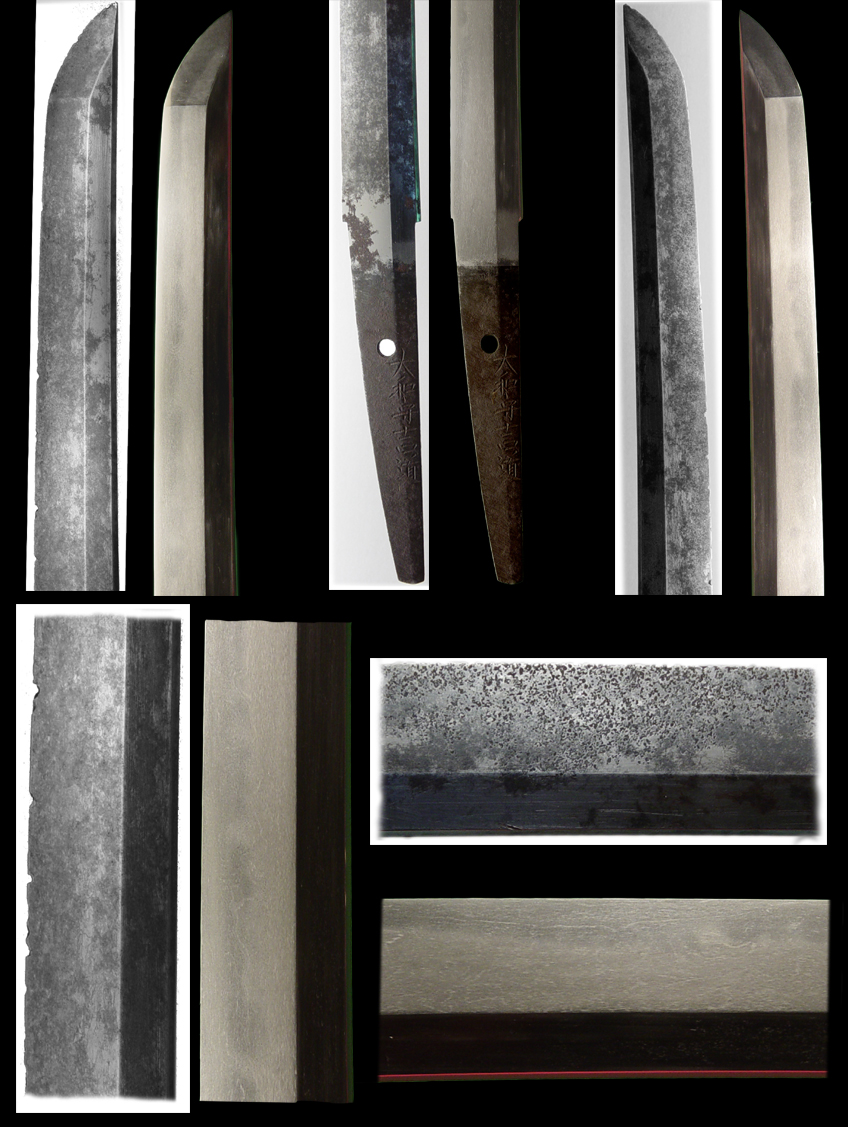
This picture shows what the Ji and the Hamon look like after finishing with the Uchigumori stone.
![]()
Finishing
polishing
(Shiage-Togi)
At this point the foundation work on this sword is done and I prepare for the finish polish.
We have a sword that has a good shape now, no chips and no rust. This is the canvas that I will apply the finish to. All the geometry is crisp and the only scratches left on the blade are from the Uchigumori stone. The Uchigumori scratches are actually smaller than the Hada and steel surface itself. That's why the Hada now is visible and the surface is a matt finish. Please take a good look at the photo below.
![]()
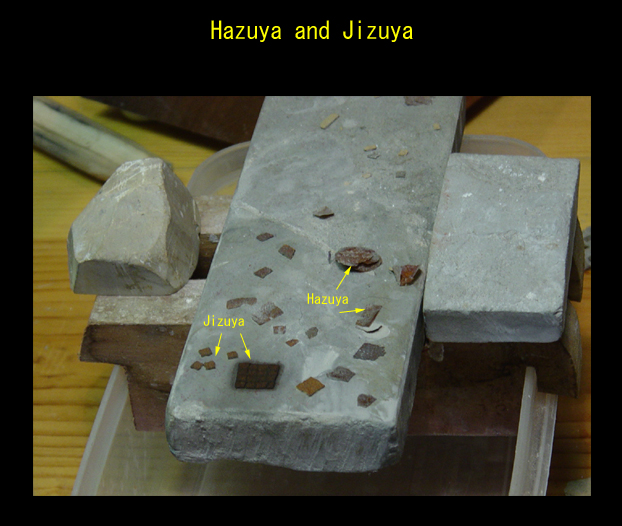
I now prepare the Hazuya and Jizuya stones. They are ground down to the correct thickness. Because the stones are so thin a layer of rice paper is applied with Urushi (lacquer) on one side. Note in this picture that they are all different colors. Each Hazuya and Jizuya is different from another, so selecting the correct one that matches the Jigane is very important. Some are harder, some are softer.
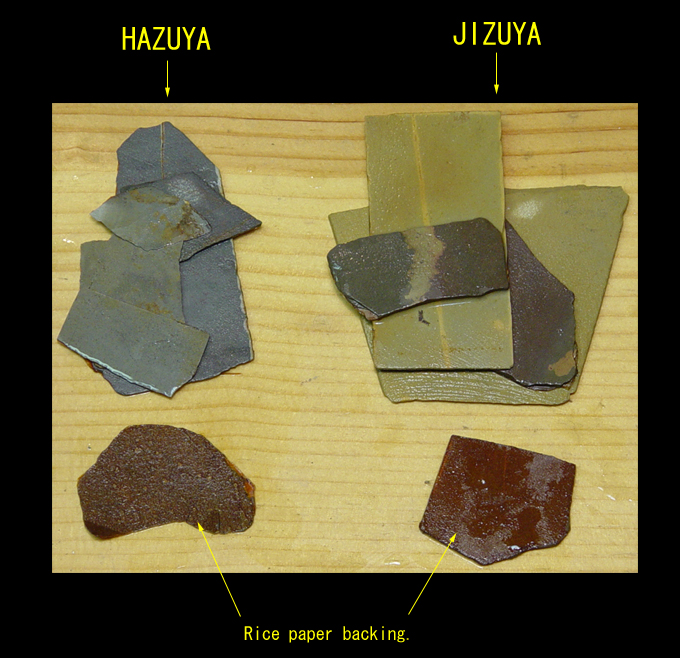
The Hazuya and Jizuya are selected and cut into small pieces. I then grind them down to the thickness that will work well on a particular sword.
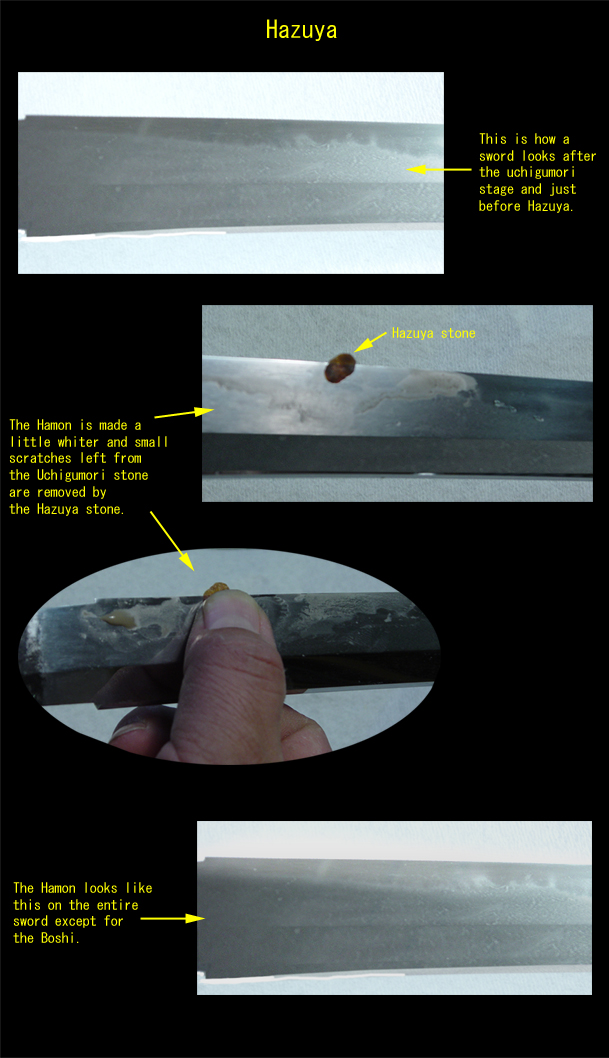
The first thing is to work on the Ha. It must be made smooth and any scratches left from the Ujigumori must be removed. Generally I don't leave any scratches from the Uchgumori stone, but this step does even out the Ha and whitens it at the same time.
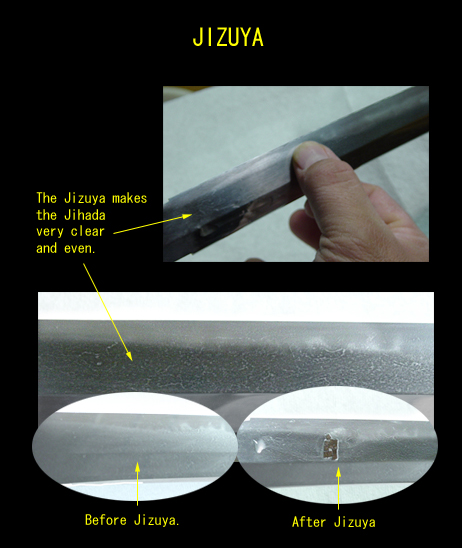
Next is the Jizuya, this will clear the Jigane further. Done correctly, and selecting the best stone will be critical for a beautiful Jigane.
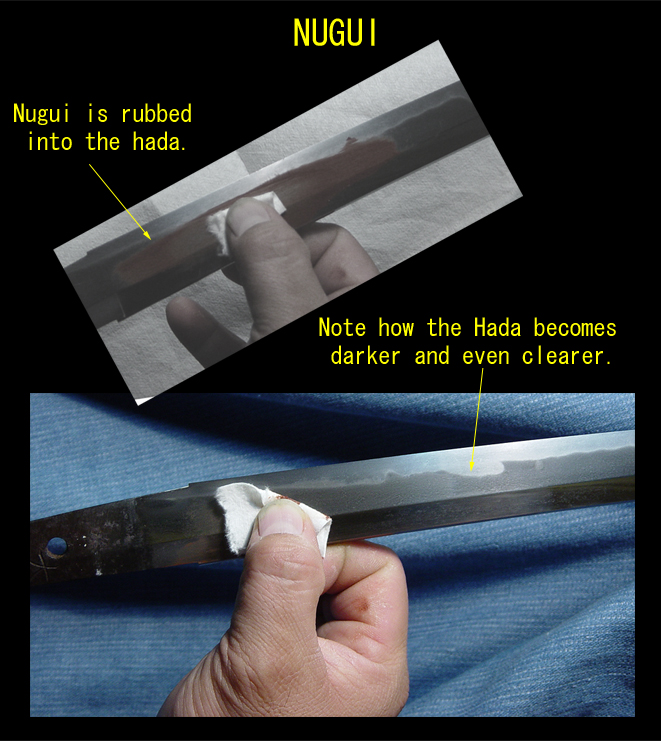
Nugui is a iron oxide that is rubbed into the ji-hada. This process darkens the hada even further.
I have decided that this Shinto sword is very healthy, and the Hamon is very beautiful, so I will polish it in a Sashikomi style. In the Sashikomi style a different Nugui is used, and some other techniques are employed to finishing the Jihada and to create a beautiful contrast between the Jihada and the Hamon. I will also demonstrate how the Kesho finish is done also.
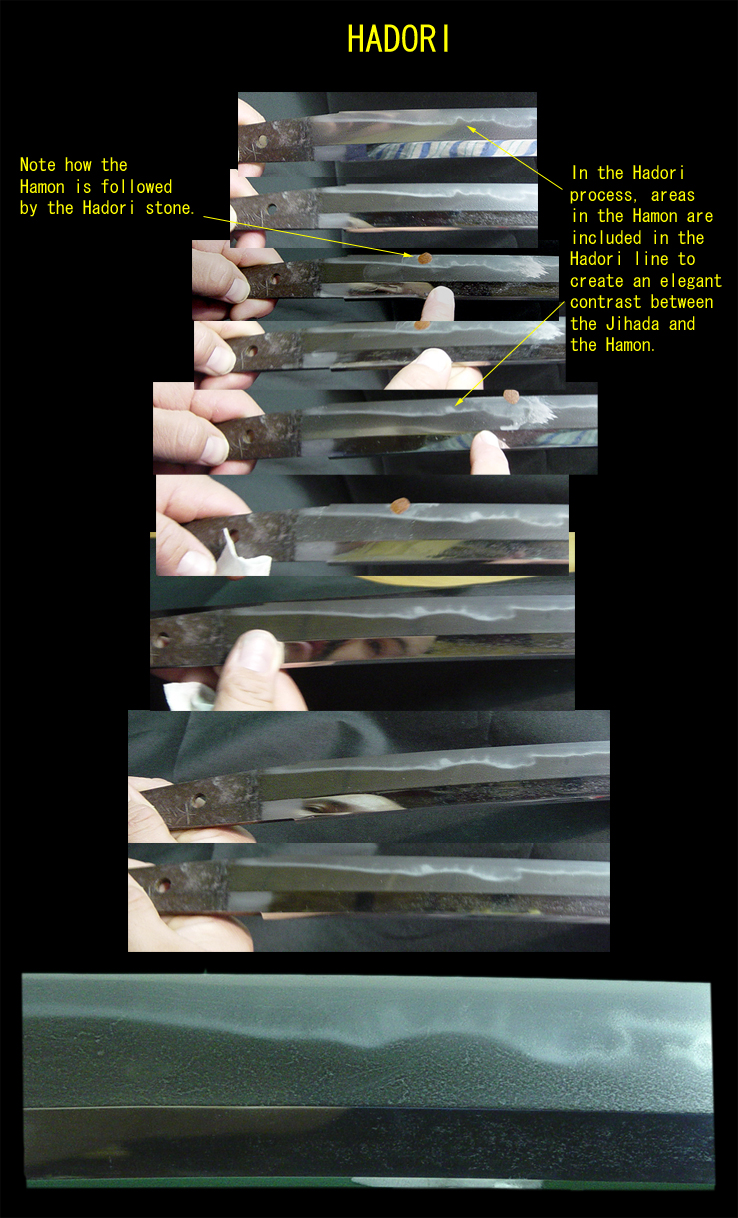
The Hadori process is done for a Kesho polish. The picture below shows how the Hadori line is created.
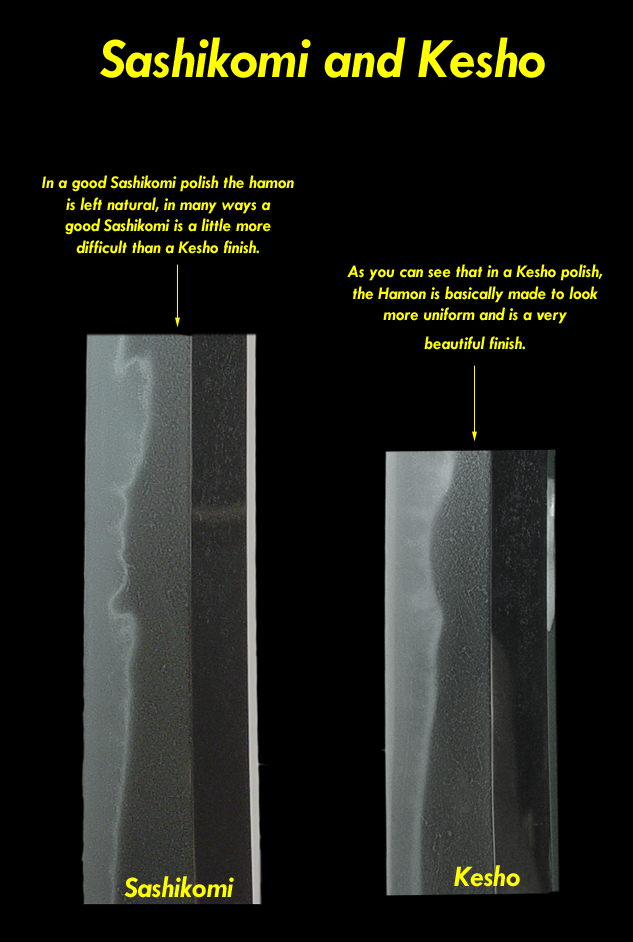
Now that the sword has been finished in a Sashikomi style, you can compare the difference in the picture below. I have also burnished the Shinogi-ji in this picture to show what a finished sword should look like.
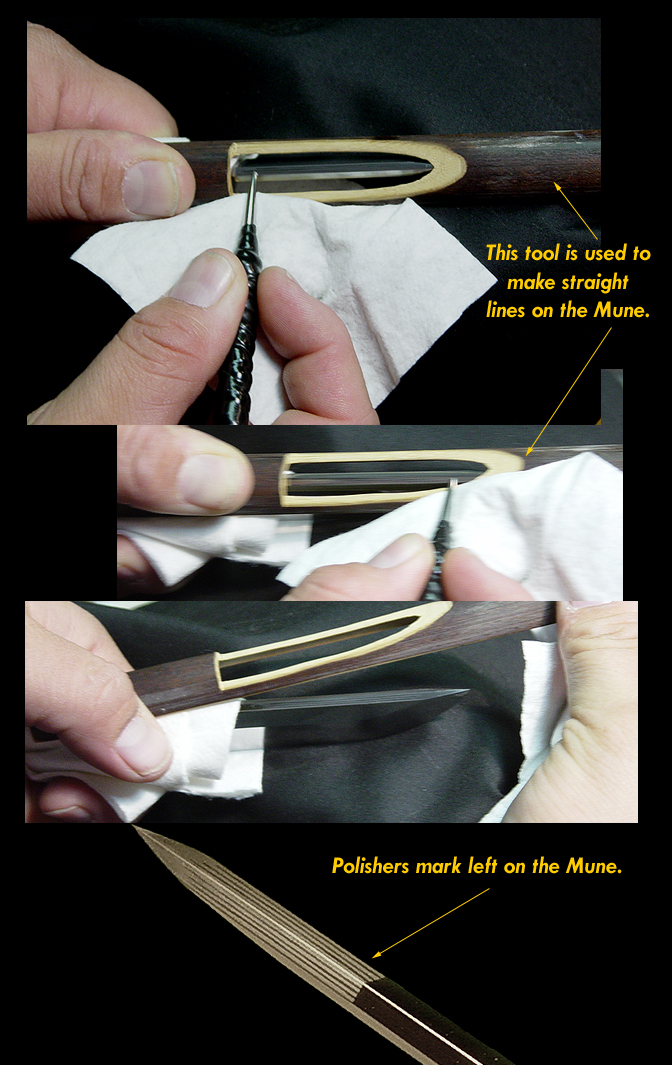
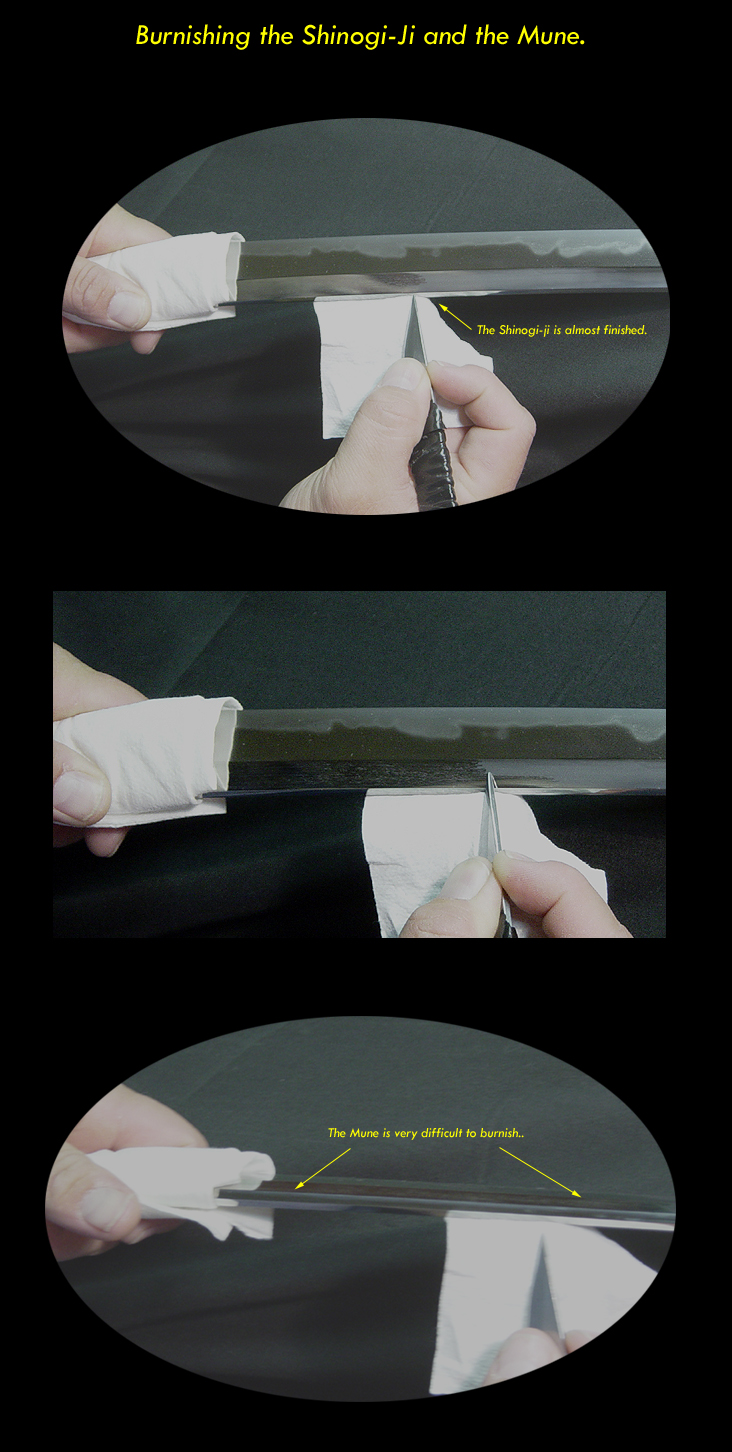
Migaki-bo (burnishing needles) are used to polish the Shinogi-ji and Mune of the sword. They also are used to leave a polishers mark under the Habaki and on the Mune by the Kissaki.
First the Polishers marks are made.
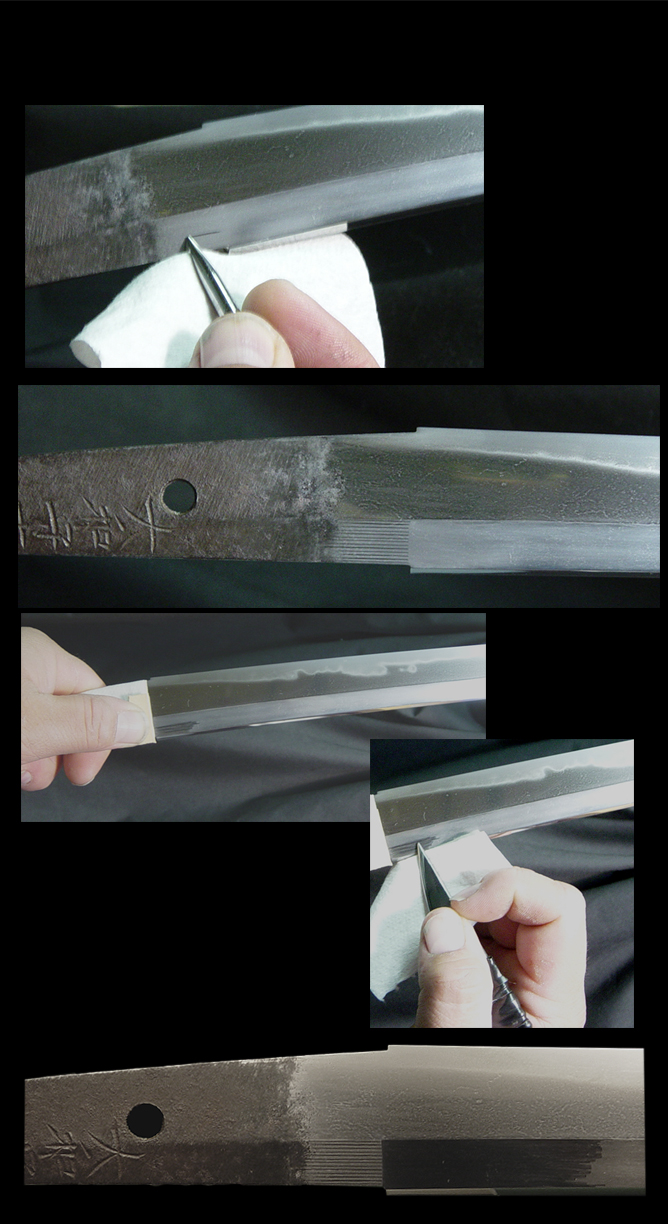
Next, the Shinogi-ji and Mune are fully Burnished. When studying a sword look carefully at the Shinogi-ji., a Koto sword can not be burnished so shiny that it looks like a Gendai-to. Also the Shinogi-ji should show the Hada within it on many swords.
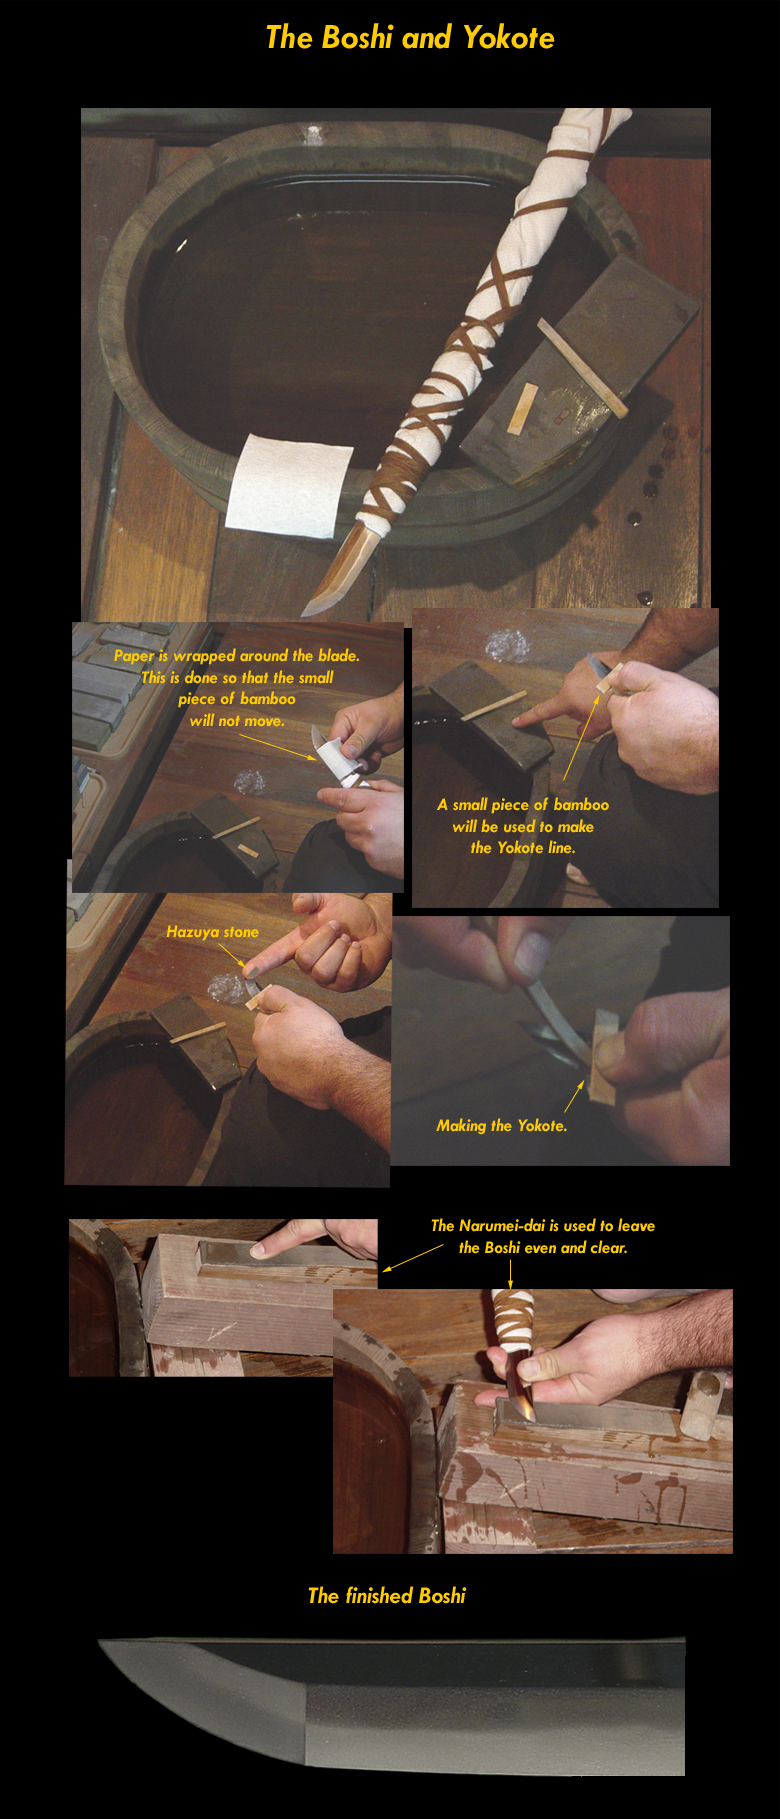
The sword is almost complete after all the burnishing is done. The only thing left is the Boshi. The Boshi is done by first making the Yokote line. Placement of this line has already been established in the foundation work. Now the Yokote is refined even further, and a clear line is made. After the yokote line is made the next step is to polish the rest of the boshi. In this step the boshi is made to match the color of the Yokote line and the entire Boshi is made clear and even by the Uchigumori stone. No scratches should be left on the boshi.
This Yoshimichi is finally done. A lot of time and effort went into polishing this sword, but now it is a beautiful sword to look at and own. Maintaining the sword in good condition is much easier now that is has no rust on it and a light amount of clove oil is left on the surface of the blade to preserve its fine polish. Compare in the picture below of the sword we started with, and the completed Yoshimichi.
![]()
![]()
I hope that this has been enjoyable for you to read. I have enjoyed working on this fine sword and hope that this section of my site has added a little more to your understanding of the NIHON TO.